Zustellbarkeit
Das Potenzial von Transaktionsmails und wie Sie es nutzen
Eine gut ausgebaute Transaktions-E-Mail-Strategie kann Ihr Online-Geschäft von der Masse abheben. Worauf Sie achten müssen, erfahren Sie in diesem Artikel.

Egal, ob Sie ein kleines Unternehmen, eine gemeinnützige Organisation oder ein schnell wachsendes Start-up-Unternehmen sind, Transaktions-E-Mails spielen eine entscheidende Rolle bei der Kundenerfahrung und sind nicht aus dem E-Mail-Marketing wegzudenken.
Man muss sich nur die Zahlen ansehen: Studien zeigen, dass 93 % der Menschen sagen, sie würden ein Unternehmen wegen einer schlechten Erfahrung mit einer Transaktions-E-Mail nicht mehr nutzen.
Deshalb ist die Wahl des richtigen Anbieters für den Versand von Transaktionsmails für jedes erfolgreiche E-Commerce-Unternehmen von entscheidender Bedeutung.
Richtig eingesetzt, können Transaktions-E-Mails ein leistungsfähiges digitales Marketinginstrument sein, dass Ihr Unternehmen wachsen lässt.
In diesem Artikel erfahren Sie alles, was Sie über effektive Transaktions-E-Mails wissen müssen.
Inhaltsverzeichnis
7 Vorteile von Transaktions-E-Mails:
DSGVO und CAN-SPAM: Sind Marketinginhalte in Transaktionsmails legal?
Respektieren Sie Ihren Kunden, um den Spam-Ordner zu vermeiden
Was ist eine Transaktions-E-Mail?
Transaktions-E-Mails — oder ausgelöste E-Mails — sind E-Mails, die an eine einzelne Person gesendet werden und direkt auf eine bestimmte Aktion zurückzuführen sind. Sie können E-Mails zur Einrichtung eines Kontos, Double-Opt-Ins, Auftragsbestätigungen, Passwortrücksetzungen, Kaufquittungen, Lieferbestätigungen, Abmeldungen, Bestellbestätigungen, Interaktionen mit dem Kundensupport und vieles mehr umfassen.
Kurz gesagt, wenn sie durch ein bestimmtes Kundenverhalten ausgelöst wird, handelt es sich um eine Transaktions-E-Mail. Diese E-Mail-Kommunikation ist oftmals einseitig, da sie oftmals für ein bestimmtes Szenario zugeschnitten sind.
Was ist der Unterschied zwischen einer Transaktions-E-Mail und einer Marketing-E-Mail?
Obwohl sie ähnlich aussehen mögen, unterscheiden sich Transaktions-E-Mails von Werbe-E-Mails, da sie einem anderen Zweck dienen.
Marketing-E-Mails werden verwendet, um Produkte oder Dienstleistungen an ein Massenpublikum zu bewerben. Sie fördern das Markenbewusstsein, regen die Interaktion der Kunden an und führen im Idealfall zu höheren Umsätzen.
Marketing-E-Mails können Newsletter, Produktaktualisierungen, Produktempfehlungen, Ankündigungen und Sonderangebote sowie viele andere Arten von E-Mails umfassen.
Transaktions-E-Mails hingegen versorgen einzelne Kunden mit spezifischen, nicht werblichen Informationen, die sich nur auf sie beziehen. Daher ist es nicht verwunderlich, dass sie eine Reihe von Vorteilen mit sich bringen.
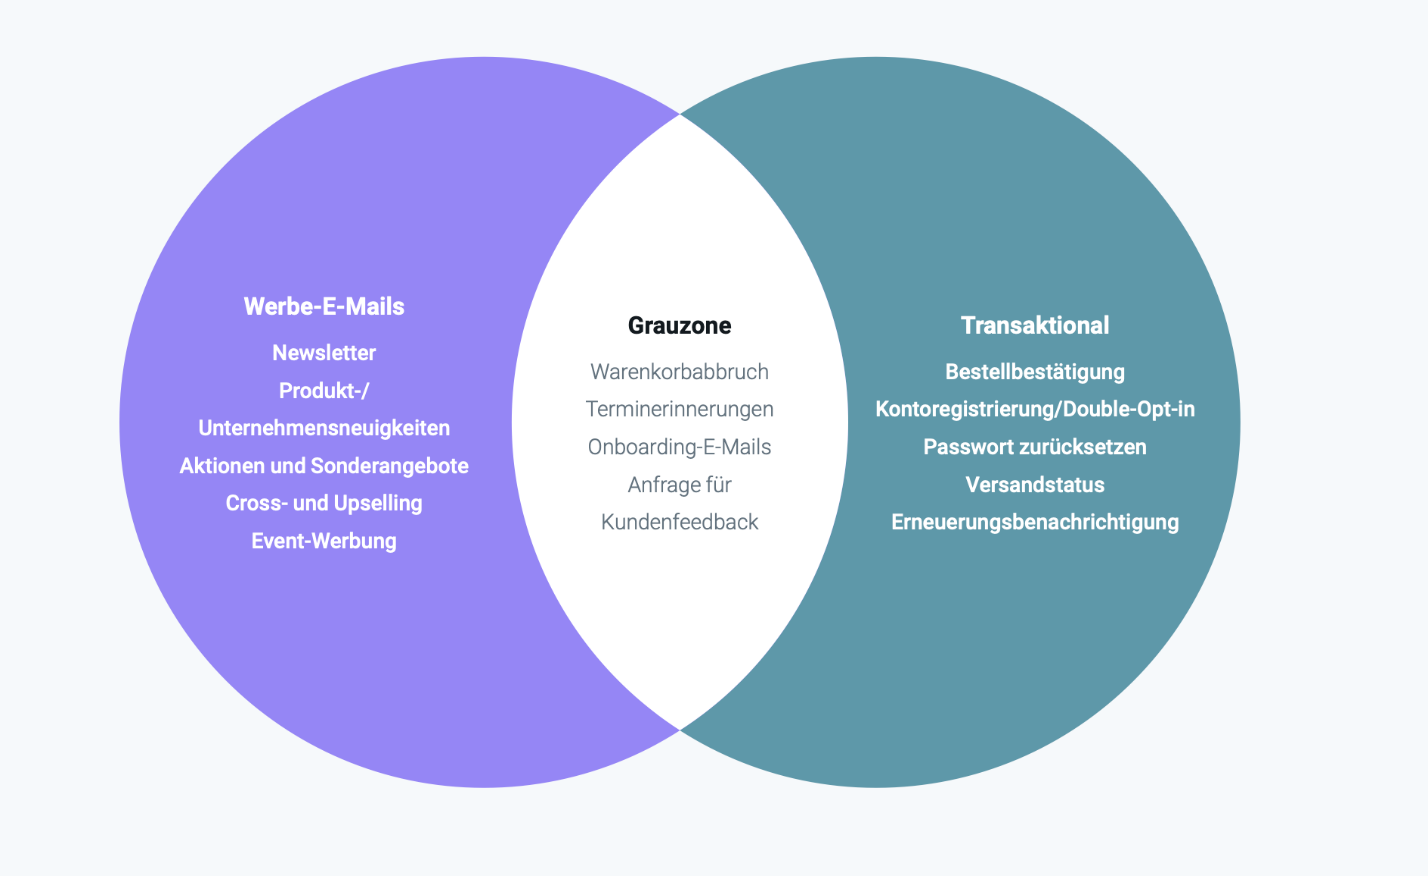
Manchmal ist es schwierig für E-Mail-Marketer, bestimmte Arten von E-Mails zu klassifizieren, die in eine Grauzone zwischen Werbe- und Transaktionskommunikation fallen – denn schließlich haben auch Transaktions-E-Mails marketingpotenzial.

Überschneidungen der E-Mail-Typen
Alt: Graphik, die zeigt, in welchen Bereichen sich Transaktions- und E-Mails mit Werbebotschaften überschneiden. Diese Grauzone beinhaltet: E-Mails für den Warenkorbabbruch, Terminerinnerungen, Onboarding-E-Mails und Anfragen für Kundenfeedback.
Arten von Transaktions-E-Mails
Nachdem Sie nun wissen, was eine Transaktions-E-Mail ist und wie sie sich von einer Werbe-E-Mail unterscheidet, wollen wir uns einige der häufigsten Beispiele für Transaktions-E-Mails ansehen:
Art der Transaktions-E-Mail | Beschreibung |
|---|---|
Art der Transaktions-E-Mail | |
Bestätigung der Bestellung | Eine Bestellbestätigungs-E-Mail ist eine automatische Nachricht, die ein Unternehmen an einen Kunden sendet, nachdem dieser eine Online-Bestellung aufgegeben hat. Sie bedankt sich in der Rege l beim Kunden für den Kauf, fasst die Einzelheiten der Bestellung (Artikel, Mengen, Preise) zusammen und gibt einen voraussichtlichen Liefertermin an. |
Beschreibung | |
Versandbenachrichtigungs | Versandbenachrichtigungen sind Höflichkeits-E-Mails, die ein Unternehmen verschickt, um einen Kunden darüber zu informieren, dass seine Bestellung versandt wurde und auf dem Weg ist. |
E-Mails zum Zurücksetzen des Passworts | Nachdem ein Benutzer einen Antrag auf Zurücksetzung des Kennworts gestellt hat, wird eine E-Mail mit einem Link oder einer Schaltfläche zum Erstellen einer neuen Anmeldung verschickt. |
E-Mails zu abgebrochenen Einkäufen | Eine E-Mail über einen abgebrochenen Warenkorb ist eine automatisierte Nachricht, die an Kunden gesendet wird, die Artikel in ihren Online-Einkaufswagen gelegt, den Kauf aber nicht abgeschlossen haben. Sie soll sie daran erinnern, den Online-Shop erneut zu besuchen und den Bestellvorgang abzuschließen. |
Lieferbest | Eine automatisierte E-Mail-Nachricht, die von einem Versender oder Einzelhändler verschickt wird, um einen Kunden darüber zu informieren, dass seine Bestellung zugestellt wurde. |
Double | Eine Double-Opt-In-E-Mail ist eine Bestätigungs-E-Mail, die gesendet wird, nachdem sich jemand für Ihre E-Mail-Liste angemeldet hat. Der Empfänger klickt auf einen Link in der E-Mail, um seine Anmeldung zu bestätigen und offiziell ein Abonnent zu werden. Dieser zusätzliche Schritt stellt sicher, dass Sie einen engagierten Abonnentenstamm haben, und reduziert die Anzahl der gefälschten Adressen in Ihrer Liste. |
Vorteile von Transaktions-E-Mails
Eine solide Marketing-E-Mail-Plattform ist ein Grundpfeiler jeder erfolgreichen Wachstumskampagne, aber das bedeutet nicht, dass Sie Ihre Transaktions-E-Mail-Strategie vernachlässigen sollten. Neben regelmäßigen Mailings sollten Sie diesen Bereich nicht vernachlässigen.
Eine gut ausgebaute Transaktions-E-Mail-Plattform hat einen tiefgreifenden Einfluss auf die Kundenbeziehung und somit das gesamte Kundenerlebnis.
7 Vorteile von Transaktions-E-Mails:
1. Personalisierung: Mit Transaktions-E-Mails können Sie Ihre Inhalte anhand von Verhaltensdaten auf bestimmte Kunden zuschneiden.
2. Kundenbindung: Die Personalisierung führt zu einer verstärkten Beschäftigung mit Ihren Inhalten.
3. Vertrauen aufbauen: Transaktions-E-Mails können dazu beitragen, das Vertrauen der Kunden in Ihre Marke zu stärken, indem sie ihnen wichtige Informationen liefern, wenn sie sie brauchen.
4. Marketing-Automation und Zeitplanung: Die Einrichtung von Marketing-Automatisierung und Workflows bedeutet, dass Transaktions-E-Mails als Echtzeit-Reaktion auf eine bestimmte Aktion fungieren können, was zu einem besseren Kundenerlebnis insgesamt führt.
5. Marketing-Optimierung: Transaktions-E-Mails können auch als Gelegenheit dienen, um für verwandte Produkte oder Dienstleistungen zu werben, die auf den Vorlieben Ihrer Kunden basieren.
6. Nachverfolgung: Mit Transaktions-E-Mails können Sie Kennzahlen wie Öffnungen, Klicks, Bounces und Blockierungen verfolgen. Dienste wie Mailjet können Ihnen sogar Webhook-Benachrichtigungen in Echtzeit liefern.
7. Markenbekanntheit: Ob es sich um eine Willkommens-E-Mail oder eine Versandbestätigung handelt, Transaktions-E-Mails verleihen Ihrer Marke zusätzliche Sichtbarkeit.
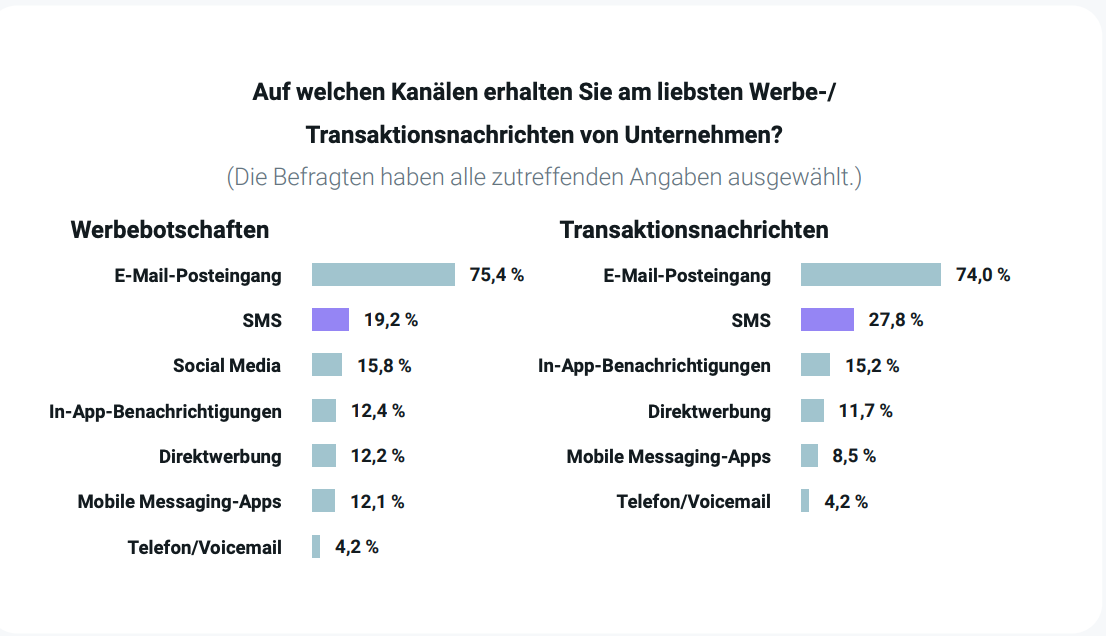
Transaktions-E-Mails bieten nicht nur zahlreiche Vorteile, sondern Daten aus unserem kürzlich veröffentlichten Bericht Der Weg zu mehr E-Mail-Interaktion 2024 zeigen, dass 74 % der Verbraucher in Deutschland, Spanien, Frankreich, Großbritannien und den USA E-Mail als bevorzugten Kanal für den Erhalt von Transaktionsnachrichten von Marken wählen.

Auf welchem Kanal Kunden Transaktionsnachrichten erhalten wollen. Die Daten finden Sie in unserem E-Mail-Interaktionsbericht aus 2024 und einen kleinen Einblick erhalten sie hier.
Punktlandung im Posteingang
Das bringt uns zu einer der Stärken von Transaktions-E-Mails: die Zustellbarkeit.
Transaktions-E-Mails haben dank ihrer hohen Öffnungsrate und Klickrate einen erheblichen Vorteil bei der Zustellbarkeit. Einigen Schätzungen zufolge werden Transaktions-E-Mails zu 80-85 % geöffnet, während die meisten Marketing-E-Mails zwischen 20-25 % liegen.
Das bedeutet, dass Ihre Transaktions-E-Mails bessere Chancen haben, im Posteingang Ihrer Kunden zu landen. Eine bessere Zustellbarkeit ist gleichbedeutend mit einer höheren Kundenbindung, einem besseren Ruf des Absenders und einer höheren Markenbekanntheit.
Wer würde sich das nicht wünschen?
Aber die Stärke der Transaktions-E-Mails bei der Zustellbarkeit kann auch eine potenzielle Schwäche sein. Wenn Ihre Transaktions-E-Mails, aus welchem Grund auch immer, im Spam-Ordner des Empfängers landen, kann dies dem Kundenerlebnis insgesamt schaden.

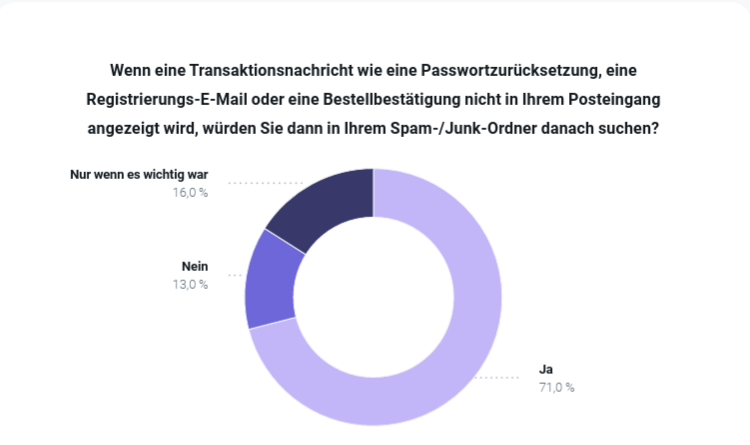
Dieses Ergebnis aus dem Interaktions-Bericht zeigt die Bedeutung von Transaktionskommunikation.
Zwar bestätigten 71 % der Befragten in unserer Studie Der Weg zu mehr E-Mail-Interaktion 2024, dass sie ihren Spam-/Junk-Ordner nach einer Transaktions-E-Mail durchsuchen würden, aber das ist nicht ideal. Es ist so, als würde der Postbote Ihre Post im Mülleimer abliefern und Sie bitten, ihn zu durchwühlen, um Ihre Post zu finden.
Glücklicherweise können Sie dies durch folgende Punkte vermeiden:
Verwendung dedizierter IP-Adressen für Ihre Transaktions-E-Mails und Ihre Marketing-Kampagnen.
Ordnungsgemäße Konfiguration der E-Mail-Authentifizierung (SPF, DKIM, DMARC).
Verwendung derselben IP-Adresse und desselben Domainnamen für alle Ihre Transaktions-E-Mails.
Steigerung der Interaktionen durch A/B-Tests von Betreffzeilen, CTAs und der allgemeinen Formatierung.
Benutzer können sich leicht abmelden.
Einrichten der automatischen E-Mail-Zustellung mit der Mailjet API und SMTP-Relay.
Befolgung von Best Practices für die Zustellbarkeit von E-Mails (eine vollständige Checkliste finden Sie in der Mailjet-Dokumentation).
Um sicherzustellen, dass Ihre Transaktions-E-Mails immer im Posteingang Ihrer Kunden landen, sollten Sie eine spezialisierte Plattform wie Mailjet oder Mailgun nutzen.
Optimieren: Transaktions-E-Mails richtig nutzen
Transaktions-E-Mails müssen nicht langweilig sein, Wenn sie richtig eingesetzt werden, können sie auch als ergänzende E-Mail-Marketinginstrumente eingesetzt werden.
Hier sind einige Tipps zur Optimierung von Transaktions-E-Mails, die Sie beachten sollten:
Kohärenz mit dem Markenimage: Bieten Sie Ihren Nutzern ein harmonisches und konsistentes Nutzererlebnis.
Die Macht des Cross-Selling: Nutzen Sie Ihre Transaktions-E-Mails, um auf andere Produkte oder Dienstleistungen hinzuweisen, die für Ihre Kunden interessant sein könnten.
Upselling-Möglichkeiten: Transaktionsnachrichten bieten auch den perfekten Vorwand für Upselling.
Loyalitätsprogramme: Nutzen Sie Ihre Transaktions-E-Mails, um für Ihre Empfehlungs- oder Treueprogramme zu werben.
Vorsicht: Risiken von Transkationsmails
Wie Sie sehen, können Transaktions-E-Mails Ihre Marketing-E-Mail-Kampagnen hervorragend ergänzen und Ihre Konversionsrate steigern.
Aber es ist wichtig, dass Ihr Marketing-Inhalt nicht den ursprünglichen Transaktionszweck der E-Mail überschattet. Wenn Sie nicht aufpassen, könnten Sie gegen die Marketinggesetze der USA und/oder der EU verstoßen. Wie viel werbliche Inhalte sind also vertretbar?
DSGVO und CAN-SPAM: Sind Marketinginhalte in Transaktionsmails legal?
Die Allgemeine Datenschutzverordnung - oder DSGVO - ist das Gegenstück der Europäischen Union zum CAN-SPAM Act und geht in ihrem Geltungsbereich darüber hinaus, um die EU-Gesetze zum Datenschutz und zum Schutz der Privatsphäre innerhalb des Europäischen Wirtschaftsraums (EWR) zu überwachen.
Die 2016 verabschiedete und 2018 in Kraft getretene Verordnung verbietet die Erhebung und Verarbeitung personenbezogener Daten aus Gründen, die nicht unter mindestens einen von mehreren Vorwänden fallen, darunter:
Einvernehmlich bereitgestellt werden
Erfüllung einer vertraglichen Verpflichtung zwischen dem Anbieter und dem Sammler
Einhaltung der gesetzlichen Bestimmungen für den Sammler
Wahrung der "vitalen Interessen" des Anbieters
Den Interessen der Allgemeinheit zu dienen
Auch andere spezifische Gesetze können für Ihren E-Mail-Versand von Bedeutung sein (EU-Datenschutzrichtlinie, kanadische CASL, um nur einige zu nennen), also seien Sie achtsam und konsultieren Sie einen Fachmann für alle Besonderheiten.
Der CAN-SPAM Act ist ein Gesetz aus dem Jahr 2003, das die nationalen Standards für den Versand kommerzieller E-Mails in den Vereinigten Staaten festlegt.
Hier erfahren Sie, wie sich das auf Ihre E-Mails auswirkt: Das Gesetz definiert transaktionale Inhalte als Inhalte, die "eine bereits vereinbarte Transaktion erleichtern oder einen Kunden über eine laufende Transaktion informieren".
Wenn Ihre E-Mail jedoch sowohl Transaktions- als auch Marketinginhalte enthält, müssen Sie sicherstellen, dass der Zweck der E-Mail eindeutig ist. Die Betreffzeile muss den Transaktionscharakter der Nachricht hervorheben, und der transaktionale Inhalt muss zu Beginn der E-Mail deutlich erkennbar sein.
Wenn Sie also zu viele Werbeinhalte in Ihre Transaktions-E-Mails packen, verfehlen Sie nicht nur den Sinn der E-Mail, sondern riskieren auch rechtliche Probleme.
Für genauere Informationen empfehlen wir Ihnen sich mit dem § 7 Abs. 3 UWG (Gesetz gegen den unlauteren Wettbewerb) und den genauen DSGVO-Regelungen für den E-Mail-Versand auseinanderzusetzen.
Respektieren Sie Ihren Kunden, um den Spam-Ordner zu vermeiden
Es ist alles eine Frage des Respekts. Ihre Kunden erkennen den Unterschied zwischen einer Transaktions-E-Mail, die ihnen helfen soll, und einer E-Mail, die als Vorwand dient, um für Produkte oder Dienstleistungen zu werben.
Zu viel Werbematerial wird Ihre Kunden verärgern, was zu weniger Interaktion führt und von E-Mail-Clients wie Gmail, Outlook und Yahoo sogar als Spam eingestuft wird.
Fügen Sie also am Ende Ihrer Transaktions-E-Mails einige Marketing-Inhalte hinzu, aber übertreiben Sie es nicht. Auf diese Weise vermeiden Sie, in die Spam-Fallen der E-Mail-Anbieter zu tappen.
Testen Sie den Transaktions-E-Mail-Dienst von Mailjet
Transaktions-E-Mails sind etwas, an dem jeder in einem Unternehmen mitwirken kann. Ganz gleich, ob Sie als Marketer versuchen, ansprechende Transaktions-E-Mails zu erstellen, oder als Entwickler eine schnelle Versand-Pipeline über API-Aufrufe aufbauen.
Genau hier können Mailjet und Mailgun helfen.
Mailjet bietet zahlreiche Dienste, mit denen Sie effektive Transaktions-E-Mails entwerfen, versenden und verfolgen können.
Von der Erstellung aufmerksamkeitsstarker, personalisierter und reaktionsschneller E-Mails bis hin zu wichtigen Echtzeit-Analysen des E-Mail-Verkehrs bietet unsere Transaktions-E-Mail-Lösung vielseitige Unterstützung für Entwickler und Marketer gleichermaßen.
Wenn Sie nur nach einer technisch ausgereiften Lösung für den Versand von Transaktions-E-Mails in großem Umfang suchen, sollten Sie die API von Mailgun ausprobieren.
Verwandte Lektüre
Beliebte Beiträge

Deliverability
17 min
How to avoid email spam filters
Mehr lesen

Deliverability
7 min
Noreply email address: Best practices for your email strategy
Mehr lesen

Email best practices
6 min
What is an SMTP relay and why do we use it?
Mehr lesen


